
2.3 - Integrating with SmartGit
 SmartGit allows the integration of third party tools to provide comparison and non-automated merge operations for complex file types. This page
details how to integrate Oso XML Merge to provide comparison and merge services for Visual Studio project files. The steps here though can be adapted
for any type of XML file.
SmartGit allows the integration of third party tools to provide comparison and non-automated merge operations for complex file types. This page
details how to integrate Oso XML Merge to provide comparison and merge services for Visual Studio project files. The steps here though can be adapted
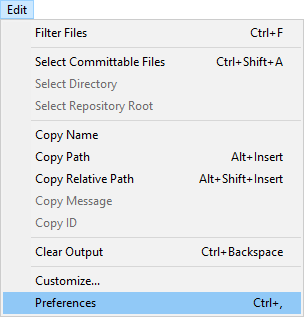
for any type of XML file.First you should launch SmartGit, and open the Preferences Dialog. This is done by selecting the Preferences option at the bottom of the Edit menu as shown in the image to the right.
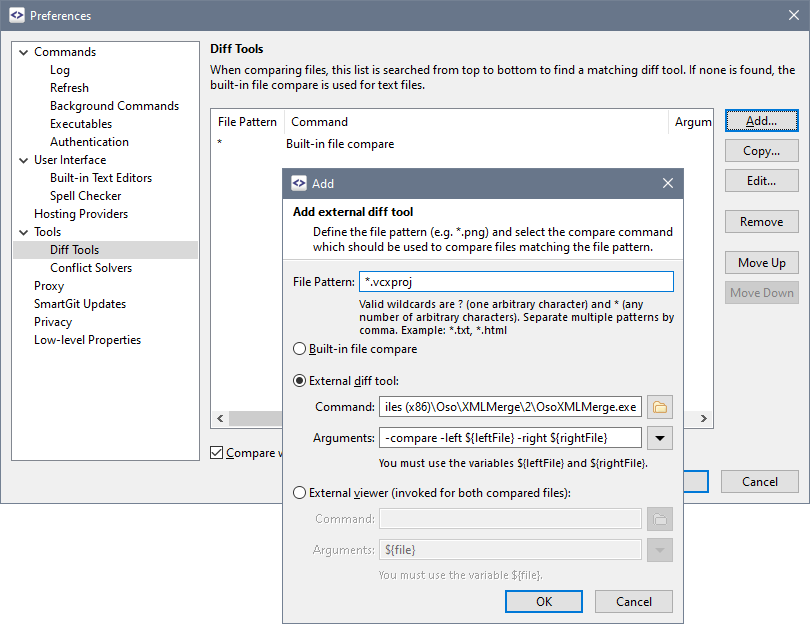
Fill in the information for the new file type as detailed below:
File Pattern
*.vcxproj
This is the file extension for Visual Studio C++ project files.External diff tool/Command
Browse to the Oso XML Merge application folder and select the Oso XML Merge executable. This will be located under either
Program Files or Program Files (x86) depending on which version of Oso XML Merge you
installed, and whether you are using a 32-bit or 64-bit version of Windows.External diff tool/Arguments
-compare -left ${leftFile} -right ${rightFile}
These are the command line options instructing Oso XML Merge to compare the two files specified by SmartGit.
Now we'll set up SmartGit to use Oso XML Merge when merging files. SmartGit always performs three-way merges with a common base file and two changed files that are combined into a single result file.
In the SmartGit preferences dialog, click on the Conflict Solvers item in the tree on the left, and then on the Add button as before to open the Add dialog:
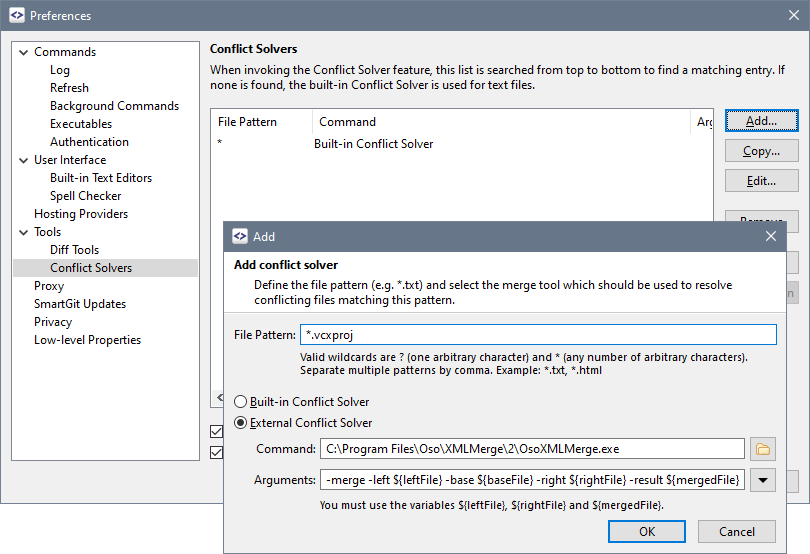
And once again, fill out the information for the new file type as below:
File Pattern
.vcxproj
This is the file extension for Visual Studio C++ project files.External Conflict Solver/Command
Browse to the Oso XML Merge application folder and select the Oso XML Merge executable. This will be located under either
Program Files or Program Files (x86) depending on which version of Oso XML Merge you
installed, and whether you are using a 32-bit or 64-bit version of Windows.External Conflict Solver/Arguments
-merge -base ${baseFile} -left ${leftFile} -right ${rightFile} -result ${mergedFile}
These are the command line options instructing Oso XML Merge to merge the three input files specified by SmartGit into a single output file which
SmartGit will read back once the merge is complete.
SmartGit allows you to specify multiple file extensions for a single third party application, so you can edit the above settings to apply them to as many file types as you require. Simply modify the File Pattern to include a comma-separated list of file extensions. For example, you can use Oso XML Merge to compare and merge Visual Studio property sheets as well as C++ project files by changing the File Pattern to *.vcxproj, *.vsprops.